Showing posts with label Christmas. Show all posts

Thursday

Cranberry-Lime Infused Vodka - Great Last Minute Gift!

Last year, while perusing Pinterest looking for ideas for the kids' gift baskets, I came across a beautiful pin. Cranberry Lime Vodka. Well, let's see what's wrong with this idea. Cranberries? Nothing wrong. Vodka? Nothing wrong. Hey, lime works with it. I got so excited after we made our bottles that I took it into work to show the others. One of gals even made several for her family. If you do a web search, you will find a lot of blog posts about it, but I think the pin I originally saw was from Fancy Napkin

Our labels included a simple martini recipe. I also admonished my kids for their lack of proper bar implements.

Making the Cranberry-Lime Infused Vodka was simple. I had a more difficult time finding a template for all of the gift tags we needed to print. I think we made 3 large bottles and 3 small bottles - all of which I found at The Container Store. Last year, we made the infused vodka the weekend before Thanksgiving because we were traveling to my daughter's home in South Carolina 2 weeks before Christmas to celebrate Thankschrismahannukwanzaakah. It had been a few years since we were all together, so I was determined to make it special.

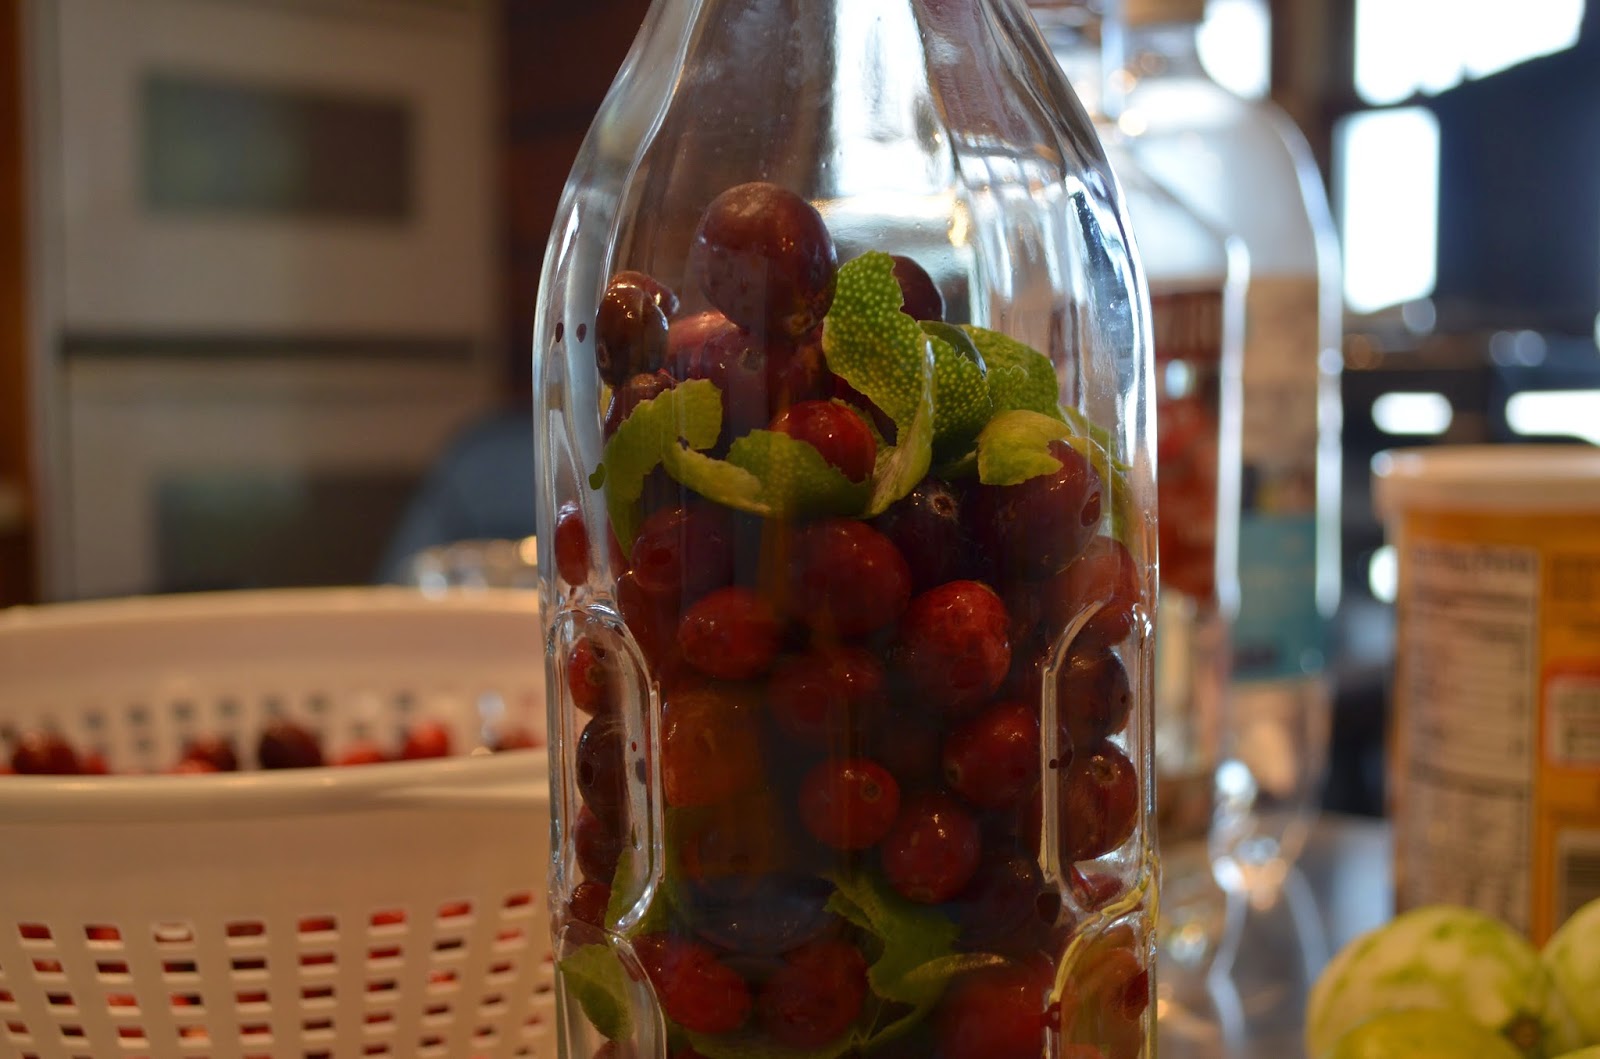
There really is no recipe to follow. Fresh cranberries, lime peel, a wee bit of granulated sugar, and enough vodka to fill the bottle. Some of the blog recipes I've seen suggest any old vodka. While I wouldn't go Grey Goose on this, you really don't want the low-proof grocery store vodka. We used 80 proof Smirnoff and the end flavor was very smooth.

The most important suggestion I followed from Fancy Napkin was to pierce each cranberry with the tip of a knife. Wash your fresh cranberries, then allow to dry (you don't want to dilute the vodka). We had rinsed our bottles the night before, so they were completely dry, as well. I used a very sharp knife to peel the limes, being careful to limit the amount of white pith. The white is bitter and only gets worse over time.

Harry and I pierced each cranberry as we put it into the bottles, and it really didn't take an awful amount of time. We layered the lime peel at about 1/3 full, then at the 3/4 mark. Once you've completely filled your bottles with the cranberries, add just 1-2 teaspoons of granulated sugar (depending upon the size of your bottle). The sugar will balance the bitterness of the cranberries, but not make it sweet. Fill the bottle completely with vodka. The top cranberries will attempt to float, so just push them back down. Put the cap on and let it steep for at least 2 weeks. If you're reading this on December 23, get ye to the store for your supplies, then tell your recipient to wait a couple of weeks before drinking. We did shake it every few days to keep the flavor mixing around.

 I found the template for the labels free online at the MS store, and printed them on some light card stock I found at Pat Catan's. I cut them apart with some scalloped scissors intended for scrapbooking. We tied them on with some rough twine.

We were wrapping and packing the baskets in our hotel room the morning of our gift exchange. I had forgotten to take a picture in better light. But, I think you can see below how pretty of a red the vodka became from the cranberries.


Harry and I held onto our bottle of Cranberry-Lime Infused Vodka for a few months and it was delicious. Yes, we kept the cranberries in and there was no bitterness. In fact, I drank it with just tonic. I plan to make a few bottles this year, but I will probably go with a different bottle. I didn't have the patience to pull all the cranberries out with tweezers, so I ended up throwing away the bottle. A bottle with a more open neck would have been a better choice.

Cheers!!

Sunday

Easy Shortbread Cookies

There are a lot of good things to love about these Shortbread Cookies and nothing to hate! Well, other than getting used to the technique.

I love shortbread. There is something about that simple yet rich taste that can't compare to chocolate - believe it or not. The raspberry preserves I normally use add a layer of flavor that is simple yet decadent. One of the best versions I've made was topped with Chocolate-Raspberry Preserves from Ann's Raspberry Farm in Fredericktown, Ohio. Sadly, they don't have their website up and running for orders and I wasn't able to get to the Mount Vernon Farmers Market on the Square at the right time this year to score a jar for Christmas. le sigh. All I can say is this: I have never tasted a more decadent jam-ish treat in my life! Ann's has scored a few awards for some of their other concoctions.

I shape these Shortbread Cookies two ways - in discs or in logs that I cut while they are still warm. When I want to transport them, I use the discs. The log cookies can be fragile and break when someone picks them up from the cookie platter. I also learned something about the red stuff while I was making them for this blog post.

Do NOT use any commercial stuff called "jelly" to top these Shortbread Cookies. In most "thumbprint"-type cookies, the expectation is there that the jam will soften and melt from the heat that is held in the cookies. Commercial jellies contain enough pectin to keep it jelled through a nuclear blast. To make these, I only had strawberry jelly (yes, from Kroger, please don't judge me!) on hand and it was 4 AM. After I added the jelly, I put them back in the oven to warm it. Even after 10 minutes (hot ovens but turned off), the jelly wasn't soft enough to completely break down. Note to self: just don't.

This recipe for Easy Shortbread Cookies can be multiplied up to 4 times the recipe successfully. OK, I'll admit to not trying to go any higher. Once you get used to the method, they are quick to create - so quick, you can put these on a plate within an hour of receiving that holiday phone call that starts with "we were in the area and thought we'd drop by!"

So few ingredients: flour, sugar and butter.
I have no scientific evidence that pouring the dry ingredients over the butter is better for making shortbread cookies than my own experience or likes. I like doing it this way because the flour/sugar is what my pastry blender will come into contact with first, coating the blades before they go into the butter.
I'm sorry Alton Brown. I know that my pastry blender is a unitasker and I could accomplish cutting the fat into the dry with a pair of knives. In my own defense, I've owned this pastry blender for more than 10 years, long before I was exposed to your wisdom that I worship.

A lot of recipes for pie crust or the like include a description along the lines of "cut the fat into the dry until the mixture resembles fine crumbs like cornmeal." Well, I never quite get to the cornmeal stage with my shortbread cookies but this is the texture I strive for.

When I'm "kneading" - meaning, squishing the shortbread cookie dough into a ball - I run cold water over my hands to chill them, and then dry my hands very well. The cooler temperature of your hands will keep the butter from melting as quickly.

This is the shape I like before baking when I'm planning on the shortbread cookies doing some traveling. A much sturdier cookie, I just take a walnut-ish size wad of dough, then shape it into a flat disc and put a thumbprint into it.

The other shape I use for shortbread cookies involves taking each half of dough and shaping it into a 2" by 8" log. Do not use this method if you are shipping your cookies.

After shaping the dough into a flat, log-like thing, use a spoon to form a trough down the middle of the dough. This will create a more thin layer of cookie in the middle, making it possible for the cookies to break when someone picks it up.

While the shortbread cookies are baking, you'll make the glaze. Make sure it's thin - you aren't shooting for a spreadable icing. And yes, pure vanilla extract will cause your glaze to take on a beige-ish color. Clear vanilla extract might leave it white but it doesn't have as good of a flavor.

These easy shortbread cookies don't actually rise in the oven, but they do puff up a bit. You need to reform the divot as soon as they come out of the oven.

The same thing applies if you use the log-shape method. Run a spoon down the middle to form a trough for the preserves.

See??? Reforming the cookies as soon as they come out of the oven!

I've added the (completely misinformed) jelly to the cookies!

After I warmed the log in the oven, I was able to spread the jelly a little easier - still not as smooth as I like!
Aren't they pretty? You could probably use a green mint jelly if you like to keep with the Christmas theme but I think red is best. Cut the logs on a bias (diagonally).

Easy Shortbread Cookies

1 1/4 cup all-purpose flour
3 Tablespoons granulated sugar
1/2 cup butter at room temperature
1/4 cup of your favorite red preserves or jam
1/2 cup sifted powder sugar
1/8 teaspoon pure vanilla extract
1-3 teaspoons milk

Preheat the oven to 325 degrees Fahrenheit. In a medium bowl, combine the flour and sugar. Add the butter and cut it in using a pastry blender or a pair of knives until the mixture resembles crumbs. Pour the mixture onto a clean work surface. Working quickly with cool hands, knead the mixture until it holds its shape.

On an ungreased baking sheet, shape the dough into 2 logs 2 inches by 8 inches OR into discs using a walnut-sized piece of dough. Form indentations that will hold the preserves.

Bake at 325 for 20 minutes or until bottom edges are very lightly browned. Working quickly when you remove the cookies from the oven, reform the indentations with a spoon. Add a dab of preserves to each cookie or fill the trough if you made logs. Drizzle lightly with the powdered sugar glaze and allow to cool completely.

To make the powdered sugar glaze: Combine the powdered sugar and vanilla in a small bowl - it will resemble a very dry paste. Add the milk, 1 teaspoon at a time until it is thin and runny.

Friday

Holiday cocktails...

I was a bartender in a former life and I loved making "pretty drinks" when the holidays rolled around. At home, I'm kind of partial to the punchbowl rather than setting up a full bar.

The Whiskey Slushies absolute ROCK! I make it twice a year - at Christmas and once in the summer for a long holiday trip to the river to visit with Mom & Dad. In years past, I have been able to find 7-up or Ginger ale in "red" flavors like pomegranate and cherry. Mom still wants "regular" 7-up with it but the red mixers do make the drink very pretty!

CHEERS!

10 Holiday Cocktails for Office Parties

If you do decide to create a full bar for your holiday party, you must have the right tools! Your bartender needs a jigger more than anything. This kit includes the jigger, wine service and a shaker and these will last forever!

Related Posts Plugin for WordPress, Blogger...