Showing posts with label main dishes. Show all posts

Sunday

Pesto Chicken Roulade


Chicken has found a larger presence in our diet over the last year. We both enjoy it, but sometimes it's just hard to come up with something different. A gal I work with mentioned buying some stuffed chicken breasts at the store, and one of them was a pesto and something. I mentioned it to Harry and we decided to give it a try.

Roulade is simply a fancy term for "roll-up". The chicken breasts we buy at Lanning's are HUGE and this would easily serve four people. In fact, I think I made it one night when we were kind of tired and it was the only thing we ate - and still had leftovers. I've taken the leftovers to work and heated in the microwave with no issues.

This isn't really a recipe that can be measurement specific. Count on one large breast for every two people you plan to serve.


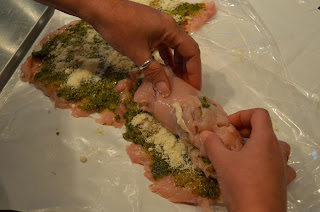
I trimmed the extra fat from each breast, then put it inside a zip bag. It's great therapy to pound the dickens out of a piece of meat.


I use the zip bag because I'm not fond of raw chicken juice flying around the kitchen.


After the chicken, the ingredients are pretty simple. I used about a half-cup of pesto to cover both breasts, about a half-cup of parmesan-romano blend, one-third of a cup of mayo and just enough panko to coat. Use your own homemade pesto, mayo and crumbs, along with your fresh-grated cheese. We've had to make some sacrifices (read: cut some corners when we don't have hours to spend in the kitchen) since we both went back to work full time.


The pesto isn't coated too thick, nor the cheese - go with your own tastes. In the end, we found a nice balance between the chicken and the filling. I learned by error that pesto can be overwhelming if I use a too-heavy hand.


Then, roll up the chicken from the long side. Place seam side down on your work surface. I did all of this on the paper that the chicken was wrapped in.


I might have gone a little heavy with the mayo on this try. Trust me when I say the mayo does nothing more than seal the moisture in and keep the crumbs attached. After this was cooked, we didn't taste the mayonnaise. The chicken, however, was SO juicy.


Sprinkle on a coating of panko (I've also used regular dried bread crumbs with success) and place the breasts in a pan. Bake at 350 degrees for about an hour, or until your thermometer reads 160 degrees.


The crust browns nicely at 350. I wouldn't recommend going much higher - the crust might brown too quickly and the chicken get dry before the inside is cooked through.


Harry sliced the Pesto Chicken Roulade and it came out rather nicely for our first attempt at something like this. The bruschetta was yummy too!

As I said above, this is more for an idea of what else to do with chicken. Pound your breasts flat, smear them with ingredients you enjoy, roll it up and bake it.

Enjoy!

Chicken and Dumplings from Scratch

When I was a kid, I can remember a couple of my friends' mothers making chicken and dumplings regularly. I still remember Mrs. Altizer whipping together a batch in no time at all one Sunday after church. Mrs. Kerschner made dumplings to serve with mashed potatoes on a week night!

The first time I ever made chicken and dumplings was after I'd been married for about five years. I used a recipe called "Chicken Fricassee and Dumplings" from a Betty Crocker cookbook that was a gift when I first got married in 1983. The ex-husband didn't like them because the chicken was still on the bones. I didn't like them because the dumplings were like biscuits - they weren't like the slippery dumplings I remember from my youth.

For years, the slippery (noodle-like) dumplings eluded me. I would occasionally make the drop dumplings, but I never found a recipe that told me what I was doing wrong. I had to satisfy that slippery-dumpling-craving with occasional visits to Cracker Barrel.

When I saw the picture for this recipe on Pinterest, I knew I had found the dumplings of my memories. The recipe, from the Tasty Kitchen, is easy to follow and a bit different from standard noodles. When I make homemade noodles, the dough is very stiff. I mistakenly used the food processor the first time I made these dumplings but it wasn't necessary. I used the pastry cutter (sorry Alton Brown) to blend the butter into the dry ingredients and it's easy to stir the milk in with a silicon spatula.

The dough will be very soft and you need to use a lot of flour with this recipe to keep it from sticking to the work surface. Someday, when I'm all grown up, I'll remember to buy a pastry mat. Just a few light strokes with the rolling pin and I had a uniform thickness of about 1/8". Uniformity is NOT required when you cut the dumplings with a knife or rolling pizza cutter. Useless trivia: Cracker Barrel uses a special tool to insure uniform dumplings. The prep cook uses a sugar packet to size the cuts.

This day happened to be "Harry's making homemade chicken stock" day. I pulled about four cups from the huge, simmering stock pot and poured it into the smaller pot, added 4 cups of water and about one pound of cooked chicken.

Once the stock and meat was at a strong simmer, I added the dumplings. Go ahead and add the leftover flour from the table - it will help thicken the stock or broth into a nice stew-ish consistency. Simmer for about 20 minutes, taste checking the broth and dumplings.

I forgot and added my black pepper before I took the picture. I love lots of black pepper on anything creamy, so adjust accordingly.

You can use leftover chicken or maybe a deli-rotisserie chicken, along with packaged broth or chicken stock to speed up the process. Because we already had our chicken stock and picked meat, these homemade chicken and dumplings took me about 40 minutes to make.

Chicken and Dumplings from Scratch - serves 6

2 cups all-purpose flour
1/2 teaspoon baking powder
pinch of salt
2 tablespoons cold butter
1 cup of milk (you might need a little less)
2 quarts chicken broth OR 1 quart of chicken stock and 1 quart of water
1 pound cooked, boneless chicken

While you are mixing the dumplings, bring the broth to a strong simmer over medium heat.

In a large bowl, combine the flour, baking powder and salt. Cut in the butter with a pastry blender, pair of knives, or your fingers until the mixture resembles coarse crumbs. Gently stir in 3/4 cup of milk. The dough should be very soft, like biscuits, so add the remaining milk until you have the proper consistency. It will be sticky!

Spread a generous amount of all-purpose flour on your work surface and dust your rolling pin liberally with flour. Pour/scrape the dumpling dough onto the flour. Use light strokes to roll the dough into a uniform thickness, about 1/8". You might have to dust your rolling pin with flour more than once.

Using a knife or a pizza roller (my choice because it was so fast!), cut the dough into square-ish shapes about 2 inches by 2 inches. Don't worry about perfection - the dumplings will change shape while they are cooking and won't be the same size no matter what you do!

I use a slotted spatula to transfer the dumplings from the table into the simmering broth. You want to add most of the flour you have left-over from the rolling to thicken the broth. Stir the dumplings gently and add the chicken meat.

Continue to simmer the dumplings for about 20 minutes or until cooked through.

Usually, I add a few chopped veggies to our chicken and dumplings. Diced carrots and celery add a great flavor. Simply saute them in a splash of extra virgin olive oil or canola oil in the bottom of the stock pot before you add the broth. I like to saute the carrots and celery just until they start to color to add more flavor to the broth. They will finish cooking as you simmer the dumplings.

Tuesday

Slow-Roasted Pork Shoulder

This, my friends, is about 5 pounds of slow-roasted pork shoulder. Harry did a great job of hand-pulling the meat and now it's ready for a variety of recipes - or just nibbling on it until dinner is ready!

When we find a great deal on a huge piece of meat, we can't pass it up. While we would prefer to smoke it, Harry's cooking hours are severely limited. That doesn't mean I can't have juicy, tender pulled pork that I can use in ways other than sandwiches.

I like to keep slow-roasted pork in the freezer for a quick start to a meal. We use it in a lot of our Asian-inspired dishes such as Hot & Sour Soup or stir-fry. It's super-easy to make a quick Pork Fried Rice when all I have to do is chop the meat. When we roast the pork, I also get a large amount of pork broth that I can use to make pork & noodles or simple open-faced pork sandwiches smothered in gravy.

The prep work for the pork takes about as long as it takes for your oven to preheat to 250 degrees. Low and slow is required to keep the shoulder from drying out. Someday, when I plan far enough ahead, I'd like to experiment with oven-smoking.

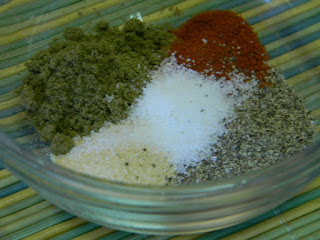
The rub for this pork shoulder is simple. We started with close to seven pounds of raw meat (bone-in), so I went a little light with the rub. In a small bowl, combine 1 tablespoon of sage, 1 teaspoon each of Kosher salt, granulated garlic and ground black pepper, and one-half of a teaspoon of paprika.

You can see that I didn't build up a crust on the pork, but rather a nice, light seasoning. You don't want to mask the flavor of the pork by going too heavy with the rub. Add about a half-cup of water or beer, cover the pan with foil, and walk away for about 6 hours. Do the laundry. Clean the bathroom. Sit on the porch with cocktails and watch the clouds pass by.

I never peek before the pork shoulder has been roasting for at least 6 hours - constant checking will allow the moisture to escape. Since we will remove the fat when we pull the pork, I'm not concerned with getting a crispy crust. You want the pork to test at at least 180 degrees Fahrenheit before you remove it. I've gotten distracted and let it go to about 200 degrees without losing any flavor or tenderness.

Once the pork has cooled enough to handle, you can use your clean hands or a pair of forks to pull the meat from the bone. Package the cooled pork and freeze for later use. OR - mix up a batch of it with your favorite barbecue sauce for sandwiches immediately - do NOT forget the dill pickle slices. They are very important.


Wednesday

Red Wine-Braised Short Ribs - March 2012 Daring Cooks Challenge

I don't know if I'm going to be able to upload any other pics from this Daring Kitchen Challenge! I switched to Picasa over the weekend and I'm having techie issues and am not happy. BUT - the above photo is our entry into the March 2012 Daring Cooks Challenge - Red Wine-Braised Short Ribs. I might be able to add more pix later.

The March, 2012 Daring Cooks’ Challenge was hosted by Carol, a/k/a Poisonive – and she challenged us all to learn the art of Braising! Carol focused on Michael Ruhlman’s technique and shared with us some of his expertise from his book “Ruhlman’s Twenty”.

Short ribs - lots of flavor but difficult to cook to edible status, unless you braise. We have avoided short ribs because we generally associate ribs with grilling. The couple of time we've mistakenly tried to cook beef short ribs with our traditional techniques - par-boil or slow-roasting, then finishing on the grill - we've been left with tough, impossible-to-chew chunks with no flavor nor tenderness.

The exciting part about joining the Daring Kitchen was to learn new cooking techniques. So, when this month focused on learning to properly braise and our minds automatically go to meat, we were hooked. In all, while this recipe is heavy on the time commitment, it's rather light in the labor department. Yes, you need to clean and chop a few veggies. Yes, you need to let the ribs simmer in the oven for about 4 hours. However, the fall-off-the-bone tenderness will convince you that you need a go-to recipe for short-ribs when they go on sale.

We made very few changes to the recipe for Red Wine-Braised Short Ribs from Carol (and probably Michael Ruhlman). I bought the last two packages of short ribs available (no, I'm lame - Kroger doesn't cut short ribs in-store) and our meat was around 2 1/2 pounds rather than three pounds. We only used about 12 ounces of fresh, sliced mushrooms rather than the pound suggested because Harry and I are still learning to embrace the fungus. AND, we added about a tablespoon of red wine vinegar to the sauce near the end because ours turned out very earthy and dark and we preferred to brighten it up. Oh - and we served it over rice. The common recommendation is to serve this recipe over mashed potatoes, buttered noodles or polenta. Sorry - we love rice!


Our impressions of the challenge:

* Texture: 5 out of 5! The beef short ribs were incredibly tender, regardless of my feelings as to how they were cut. The meat fell from the bone and I was able to cut through the chunks with my fork. The fat was cooked away during the braise.

*Technique: If I go from the mindset of an inexperienced cook, I have to give this a 3 out of 5. In all honesty, the technique for slow-braising is going to frighten off a cook who's not very experienced in the kitchen. They might not have a pot that will work for the braising method. They might be frightened by the length of time in the oven and not believe the adage that they can just 'walk away' while the meat slow-cooks in the oven. With our kitchen skills, this technique and recipe were a breeze to follow. (Well, I might still be lacking in the searing department.)

*Taste: I  think I'm being unfair to give the taste a 4 out of 5, but I know that it's our personal tastes. The honey, during the slow-braising process, cut through the acidity of the wine and the tomato paste, leaving a pleasant but not syrupy sweet taste in the braising liquid. However, we finish almost every dish with a splash or two of some type of vinegar to brighten up the taste. I have to agree, with the exception of the mushrooms (because I'm trying to learn to embrace the fungus), the portion that I reheated the next day was delicious.

You can visit The Daring Kitchen for the complete recipe for Red Wine-Braised Short Ribs and more.

Tuesday

Roast Beef Po' Boys - almost - for the slow cooker

I say these are "almost" Roast Beef Po' Boys for a few reasons. First, I made our hoagie rolls in our standard 5-6 inches-ish length, rather than making something 8-10 inches like they do in New Orleans. My debris gravy is definitely not authentic. And, while we got them "almost" dressed, there's no such thing as a good tomato in Ohio in February, so they were missing a shirt.

But, yes, that IS gravy dripping down the side!

What is a Po' Boy? A sandwich filled with goodies by another other name is still a sandwich filled with goodies. Your area of the country might call them hoagies or submarine sandwiches or grinders. In New Orleans, Po' Boy is the local lingo. Of course, the most famous versions are usually filled with breaded and fried seafood - shrimp, catfish, crawfish, or oysters. To me, a Roast Beef Po' Boy (poor boy for those who prefer to spell the whole word) is like an open-faced roast beef sandwich all wrapped up in a bun.

Technically speaking, the debris floating in the gravy are bits and pieces of meat that have naturally fallen off the roast while it is braising. I didn't technically braise (slow cooking in liquid) my roast, but it's close enough for rock 'n roll when you're using a slow cooker. When I'm cooking with chuck roast, I prefer to use my slow cooker - turn it on in the morning and around supper time the meat is fall-apart tender. But, when I trimmed the fat, there were a few pieces of meat left in the rind plus a 3-ish ounce piece of roast. I pulled these little bits and pieces out of the fat and added them to my gravy.

Finally, a lesson in dressing your sandwiches in New Orleans. You don't have to say you want "lettuce, tomato, pickles and mayonnaise" on your sandwich, whether it's a po' boy, burger or muffuletta. All you have to do is say "dressed" and your sandwich miraculously comes laden with that specific quartet of goodies. Be warned: if you are in NOLA and you ask for your muffuletta to be dressed, they'll look at you funny.

The voice inside Harry's head told me to trim the biggest part of the fat off of the chuck roast before cooking it. I wasn't about to let that flavor go to waste, so there it sits waiting on its happy purpose. My knife also needed some love and I'm not as skilled in the meat-trimming department as Harry. I made a simple rub of Kosher salt, ground black pepper, paprika, granulated garlic and ground oregano and slapped it on both sides of the meat.

Then, something very strange happened. Harry was at work and the voice in his head told me to sear the meat. Usually, when I'm making a pot roast I just throw everything in the slow cooker and forget about it. I have a strange fear of cooking things at too high of a temperature but this worked very well. Just a few minutes and the flavor at the end was well worth it.

I don't think it's possible to eat beef without onion as flavor. I had a half of a huge sweet onion in the fridge and just sliced it real quick and covered the chuck roast with it. You can't see it but on the very bottom of the crock is the fat I trimmed from the roast - I just used it to make a nice bed for the seared chuck. After the onions, I poured in a half-bottle of Great Lakes Brewing Company's Edmund Fitzgerald Porter (again, I think Harry's voice was speaking to me) and drank the rest. My cooker has settings ranging from 4 hours - high to 10-hours slow. I used 6 hours - high and it was about 7 hours (automatically turns to warm) before I started the gravy.

After pulling out all of the bits and pieces of meat from the fat and setting them aside, I strained the cooking liquid into my saucepan. I added about a half-cup of water and brought it all to a boil, including the bits and pieces of meat. Then, I made an easy flour-water slurry and added enough to thicken the gravy. I also added about a teaspoon of red wine vinegar and even though Harry was sitting there, his lips didn't move when some strange voice told me to add some butter to finish the gravy.

Now, a secret I read yesterday from New Orleans Magazine that the locals won't share with us Yankees is this: they all add a few splashes of hot pepper sauce to their Roast Beef Po' Boys. I have to agree with the logic - the Frank's didn't really add any heat but the vinegar cut through the richness of the gravy for a nice contrast. (The mayonnaise is buried under the shredded iceberg lettuce and yes, I sliced those pickles myself.)

I've actually only had one Roast Beef Po' Boy in Louisiana and it wasn't even in NOLA. We stopped at Abita Brewing in Abita Springs, LA to have a beer and decided we needed to eat. No, I don't think mine is as good as that one was but this sandwich is killer. Harry thanked me for not making them 10 inches long because he still would have felt the need to eat two. This size is just right!

Roast Beef Po' Boys for the Slow Cooker - serves 6
2 1/2 to 3 pound beef chuck roast, trimmed of large fat and rind
1/2 teaspoon Kosher salt
1 teaspoon ground black pepper
1 teaspoon granulated garlic
1 teaspoon ground paprika
1/2 teaspoon ground oregano
1 tablespoon olive oil
6 ounces amber beer or porter (yes, you can use wine or water or beef broth)
1 cup sliced onions

2 tablespoons all-purpose flour
1 1/2 cups cold water, divided
1 teaspoon red wine vinegar
1 tablespoon butter

6 hoagie rolls or submarine sandwich buns, toasted
shredded iceberg lettuce
dill pickle slices
mayonnaise
tomato slices (if available)
hot pepper sauce (if desired)
lots of napkins

In a small bowl, combine salt, pepper, granulated garlic, paprika and ground oregano. After trimming the chuck roast, rub both sides of the meat with the rub ingredients.

Heat a large, heavy-bottomed skillet over medium-high heat. When heated add the olive oil and swirl around, then place the roast, flat-side down, in the skillet. Allow to sear until a nice crust forms on the bottom, about 3-5 minutes. Turn the roast over and sear the other side. Remove from heat and set aside for a moment.

Layer the fat trimmings in the bottom of your slow cooker, then place the seared chuck roast on top of the trimmings. Cover the roast with the onion slices then add the 6 ounces of beer. Cover the cooker and let roast for 6 to 8 hours or until very tender.

Remove roast to a plate and cover with foil to keep it warm. Remove any small pieces of meat that might remain in the slow cooker or the fat and set aside in a bowl. Strain the cooking liquid into a saucepan, add 1/2 cup of water and the bits and pieces of meat, then bring to a strong simmer.

In a cup or bowl, mix 2 tablespoons all-purpose flour with one cup of cold water until smooth. Slowly add the slurry to the simmering liquid, whisking to prevent lumps, until the gravy is thickened. Add the red wine vinegar and continue to cook for 5 minutes until the flour taste is gone. Whisk in the tablespoon of butter and the gravy is finished.

To assemble the Roast Beef Po' Boys:

Thinly slice the reserved roast beef. On each toasted hoagie roll, spread mayonnaise on the top half. Pile several slices of roast beef on the bottom half of the bun and then ladle on some gravy. Top with tomato, pickle, hot pepper sauce and shredded lettuce and serve with several napkins.

Monday

Jambalaya with Shrimp, Chicken and Andouille Sausage

In our continuing celebration of Mardi Gras here in an area of the world that really doesn't care about it, we decided to make Jambalaya. Well, I gave Harry a choice - we could have Jambalaya or Shrimp Etouffee, one of his absolute favorites. When we were in NOLA, he ordered it every single night!

He really wanted his favorite, but settled with 'we've never made Jambalaya before.' Well, I have but it might have been right before we met.

I had to make do with what ingredients I could find here in Ohio, but found some awesome Key West Shrimp and an Andouille-flavored smoked sausage. No, it's not the *real* stuff, but it does provide a great flavor and some heat. Feel free to use regular smoked sausage.

There's no such thing as a one perfect recipe for Jambalaya - it's doing to be different in every single kitchen. In French cooking, the basic building block of most stews is a combination of diced onions, carrots and celery. Cajun and Creole cooks leave out the carrots and use bell peppers. I chose a yellow bell pepper because of the intense sweet flavor. Try to keep your diced veggies about the same size - celery should be a bit smaller because of the density. Sweat them in a stock pot just until they start to give off their aroma - they'll be cooking for awhile and you don't want them to turn to mush. Add the garlic and stir around for a few seconds until you can smell it.

Add the chicken and smoked sausage. We debated later that maybe I should have seared the meat first before I added the vegetables. Yeah, I might have gotten a little bit of caramelization on the meat but in the end, we didn't miss it. Saute and stir around occasionally, until the chicken is no longer pink.

Now I've added all the liquid, canned tomatoes and seasonings. Once this comes to a simmer, it's time to add the rice. Reduce the heat to low, put a lid on it and don't peek for at least 15 minutes. Taste test the rice for doneness, then add the shrimp, stirring gently just to submerge the shrimp. Cover the pot again and it's done in 5 minutes.

And time to eat. I made some quick garlic bread and we nibbled on raw veggies while I was cooking - because Harry was out of peanut-butter filled pretzel nuggets.

Debbie & Harry's Jambalaya - generously serves 6
1-2 tablespoons extra virgin olive oil
1 cup diced sweet onion
3 celery ribs, cleaned and diced
1 medium bell pepper, cleaned and diced
5-6 cloves garlic, minced
8 ounces smoked sausage or Andouille sausage, cut into medallions
2 chicken breasts, cut into chunks
1 15-ish ounce can vegetable broth
1 can low-sodium chicken broth
2 cups water
1 can roasted diced tomatoes
1 can diced tomatoes
2 teaspoons Cajun seasoning (or to taste - we used our Cajun Kick)
1 teaspoon dried thyme
Frank's Red Hot Sauce to taste (or use your favorite hot sauce)
1 tablespoon dried parsley
1 tablespoon red wine vinegar
1 1/2 cups long grain white rice (we love Basmati or Jasmine)
1 pound medium to large raw shrimp, peeled and cleaned
Chopped scallion for garnish

In a large stock pot with a heavy bottom over medium-high heat, saute the onion, celery and bell pepper until the aroma fills your kitchen, about 7-8 minutes. Add the garlic, stirring for about 30 seconds. Then, add the sausage and chicken, stirring well. Continue to saute over medium heat until the chicken is no longer pink.

Add the vegetable and chicken broths, the water, the canned tomatoes and the seasonings. Stir occasionally until the mixture comes to a simmer. Stir in the rice, reduce the heat to low and cover the pot. Do not open the lid until at least 15 minutes have elapsed. If you stir while the rice is cooking, it will clump together and get gooey.

After 15 minutes, taste the rice for doneness and adjust the seasonings if necessary. Gently stir in the shrimp and cover the pot for another five minutes. Garnish the jambalaya with diced scallions and serve with a crusty bread.

Tuesday

Harry's Mom's Meatloaf

For some people, meatloaf is boring but for many households, it's a fairly easy go-to dinner when time is tight. We we make meatloaf, it's always two loaves - Harry loves sandwiches and sometimes, we don't even eat it for dinner but make it specifically for meatloaf sammies.

I love my mom's meatloaf - when she makes it. Mine never turned out the same for some reason. I failed HUGE with a meatloaf recipe in 1984 that caused my then-husband to turn green at the slightest mention of meatloaf for dinner. OK, ok, the sausage wasn't quite as thawed as it should have been and that was long before I learned the joys of a digital thermometer. When Harry and I started The Wright Taste, my ex-mother-in-law - more than 20 years after the fact - chirped "You can't even make a meatloaf and you expect people to buy food from you?"

Harry wasn't, in general, a fan of his mother's cooking. We both have memories of the same general meals and these days, I'm not a fan of the way my mom cooked a lot of things when I was a kid. I still loved them - the only place I'll eat Ragu on my spaghetti is when Mom makes it - it's kind of hard to explain. And I STILL can't get my Boiled Dinner (corned beef and cabbage) to come out the same way Mom does, even if we buy the same brand of corned beef at the same time!

But Harry did like his mom's meatloaf and the first time he showed me the recipe, I thought "ICK!" But, this is the best meatloaf recipe I've ever tried. It's never dry and it's the perfect sandwich meatloaf - it doesn't get crumbly when you slice it and it also freezes beautifully.

This is the "normal" recipe - plenty for dinner for six plus leftover for sandwiches. Save yourself a little time and double the recipe. Freeze one loaf whole to heat for another dinner or freeze it in slices for sandwiches later. I don't know where Mrs. W got the recipe but since Harry was eating this as a kid in the late 50's, early 60s, I don't stand a chance of tracking down the original source.

Harry's Mom's Meatloaf

2 pounds ground chuck
1 cup plain bread crumbs
1 can evaporated milk
3 tablespoons ketchup
2 tablespoons dried minced onion
2 eggs, lightly beaten
1 teaspoon granulated garlic
1 teaspoon Frank's Red Hot
1 teaspoon salt
3 tablespoons butter, melted and cooled

Preheat oven to 350 degrees. In a medium bowl, combine the evaporated milk, ketchup, dried minced onion, eggs, granulated garlic, Frank's and salt. Mix it well and set aside. In a large bowl, combine the ground chuck with the bread crumbs - take your time to work all the crumbs into the meat.


Now is when it will get really messy: Have Harry pour the liquid mixture into the ground beef mixture. As you squeeze the liquid into the meat, it will originally appear to be very soupy. Mix it with your hands until the liquid and meat are well-combined, then allow to rest for five minutes. The resting time will give the bread crumbs time to absorb the moisture, so it's possible to form it into loaves.

Add the cooled melted butter and mix well. Now it's time to shape your meat loaf. Only shape it into two loaves if you have doubled the recipe.

This is where I deviate from Harry's mom's recipe: I love ketchup baked onto my meatloaf. Harry's mom always covered it with American cheese slices - the choice is yours.

Bake, uncovered, at 350 degrees for about an hour. I check the temp and try to keep it between 170 and 180 degrees inside.

Remove from oven and let rest for five minutes. Then, remove to a serving platter (to get it out of the grease), cover with foil and allow to stand for another 10 minutes - this will help the meatloaf "stiffen up" so that it's easier to cut without crumbling.
Related Posts Plugin for WordPress, Blogger...