Showing posts with label meat. Show all posts

Sunday

Cleveland's West Side Market - A Midwest Food-Lover's Fantasy Road Trip

A gorgeous April sky behind the Clock Tower of the West Side Market

We just returned from our second trip to Cleveland's West Side Market. We aren't newbies anymore, overwhelmed by all the options. We knew exactly why we were going and the lessons learned from our rookie trip made this trip SO much more enjoyable, stress-free, and relaxing.

Even before our first trip, we knew it needed to be an overnighter. It's not that Cleveland is all that far for a day trip - two hours to the market from our front door. The "problem" lies in the fact that Ohio City (the neighborhood that is home to WSM) is wickedly full of craft brewers. I like beer. I love good beer. So, a hotel room and proper use of Cleveland's RTA make for a food and brew weekend so we can both imbibe and discover.

Budget tip: If you're staying overnight, you need refrigeration for at least some of your West Side Market finds. We had reservations at the Best Western Airport. We drove in on Friday morning, and they let us park before checking in, plus their shuttle took us to the airport to catch the RTA. We checked in Friday afternoon with our WSM haul in our hands, then took the shuttle back to the airport to take the train back into Ohio City for an evening of wandering. All together, room, shuttle tips, and RTA all-day passes for 2 cost less than $125.

If you can swing it, I highly recommend NOT going to WSM on a Saturday. Neither of us (mostly me) play well in huge, tightly packed crowds. That was the one thing that led me to not be crazy about our first trip. We couldn't move. I would feel like I was always in the way, not able to take my time to really look at the vendor's offerings. Getting to the market at around 11:30 on a Friday morning? It was pure pleasure! Yes, it was busy, but once we ate our brunch, I never felt like I needed to rush my selections.

Brunch! OK, Harry had hot dogs, but I hit up Crepes de Luxe. If you are searching through reviews, you'll read that the crepes are delicious. Very true! I had the smoked salmon (with spinach, capers, and creme freche on a buckwheat crepe) and it was more than I hoped for. A perfect blend of savory, smokey, salty, earthy, with gently steamed spinach. I could eat this many more times. In reading reviews, you will also find comments that the crepes' chef isn't pleasant. I don't think that is true. She wasn't overly chatty, but look at the line forming behind you. There was one lady in front of me when I approached. By the time my crepe was in my hands, ready to burn my mouth because I wanted it so badly, there were at least 8 people in line behind me. I don't think those reviews are a fair assessment based on the volume of business that must be completed very quickly.

We made a quick trip through the market to see if anything caught our eye that wasn't on our "must" list. We bought some pretzel hoagie rolls from Michelle's Bakery to go with our intended sausage haul. We found Wellfleet oysters at Classic Seafood and had a great chat with the guy about learning that we were all wrong in thinking "an oyster is an oyster".

Tub butter was on our must list. For general cooking and baking, I keep standard sticks of both salted and unsalted butter on hand. For spreading on toast, or warm bread, or biscuits, or finishing a dish, or many other drool-worthy reasons, we love better butter. Without going into too much detail, we tasted the salted tub offerings at Irene Dever and bought 7 pounds. Delicious, with just a hint of tang that you expect with a cultured butter (although she gave me a strange look when I asked if it was cultured and then explained that it was only butter, a little salt, with no oil or other ingredients).

Now, for the primary purpose of our sojourn. Harry lived in Akron and was familiar with the sausage-makers in Barberton. He grew to have a fondness for the Eastern European sausages, and that is something that I've learned to enjoy as well. As much as I love some of the local purveyors in Columbus, I haven't yet found the variety of house-made sausage such as we found at the West Side Market (in my defense: I've not yet tried Thurn's so I might be surprised). On this trip, we brought home 11 varieties of sausage of various ethnicities and heat levels. Mix in the various styles - links, fresh, smoked, and bulk, we find the selection at Czucraj Meats to fit all of our needs.

On our first trip, we were overwhelmed at all of the offerings of animal flesh. The market was packed on that Saturday, and I'll admit that we probably stopped at Czucraj because we could actually see the offerings. We bought about 12 pounds that trip, and we weren't disappointed in anything we brought home. We did decide that the Double-Smoked Hot Hungarian was just a little hotter than we would want, but that didn't mean we didn't like it.

30.06 pounds of sausage heaven!

So - we bought a little more than that on this trip. The sausage we bought on our first visit lasted us 8-9 months. During football season, we made samplers - chunks of several types of sausage, broiled in the oven, with a selection of mustards and other companions. We used it in a variety of dishes and also hoarded it, because "there's only so much down there". This time, we'll be a little less stingy with our sausage dinners. (Note: we did the vacuum packing at home).

Our selection includes Garlic Knockwurst, Smoked Slovenian Sausage (links), Mild & Hot Hungarian, Andouille, Hot Italian (fresh ropes), Chorizo (fresh rope and bulk), and Smoked Mild & Hot Hungarian. We also brought home 4 white brats (pork and veal) that we'll have tonight with our pretzel hoagie rolls.

The only other tip I'll leave you with is regarding the produce barn. We don't buy produce there only because I can get all my veggies here in the area. Take the time to visit the review sites, specifically searching for produce vendor reviews. Some are better than others, to be sure. We saw some beautiful fruits and vegetables as we walked through. I have read (within the last 6 months) that WSM has cracked down on the allegations of bait/switch in the produce stands. I just think it's best to be informed before someone drives 2-3 hours, only to arrive home with over-ripe produce.

There are SO many more options than what we brought home. Visit the West Side Market website here for days and hours of operation (no, they aren't open 7 days). You can also read about all of the vendors' offerings and plan your march through the market. Bring along reusable shopping bags, or a backpack. Locals have wheeled carts. Currently (April 2015), the Ohio City RTA station is NOT ADA accessible (construction) and it's a very long trip up and down 3 flights of stairs to the platform. Pay attention to the parking lot signs (some lots are restricted to vendors) to avoid tows. If you drive and park, bring along a cooler to stash your purchases while you visit some of the other gems in the neighborhood.

Monday

Fast, Easy Homemade Marinades and Rubs

Our first night vacation meal every time we rent a cottage or condo - Marinated Steak, baked potato and 3G Salad!

In our kitchen, meat is the centerpiece of meals. While I have a few basic techniques that haven't changed much in 25 years - frying chicken is one example - we do like to play with flavors. Creating rubs and marinades takes almost no time at all, yet can completely change the taste and texture of old favorites and standbys.  With a few simple standard ingredients kept on hand, anyone can create a marinade or rub to rival expensive packaged convenience items. All of these recipes can be increased for larger quantities.

Steak Marinade - serves two

¼ cup extra virgin olive oil
1 tablespoon balsamic vinegar
1 teaspoon Worcestershire Sauce
4-5 cloves garlic, finely minced (adapt to your taste)
several grinds black pepper
pinch sea salt
1/8 teaspoon crushed red pepper
2 - 10 oz. ribeye steaks

Combine all ingredients, then pour the marinade over the steaks that have been placed in a zip-top bag. Refrigerate for at least 30 minutes, but it will be fine for several hours or overnight. Remove the steaks from the refrigerator at least 20 minutes before grilling in order to let the meat lose its chill. 

Rub for Pork

2 tablespoons ground sage
2 tablespoons granulated garlic
1 tablespoon black pepper
1 teaspoon sea salt

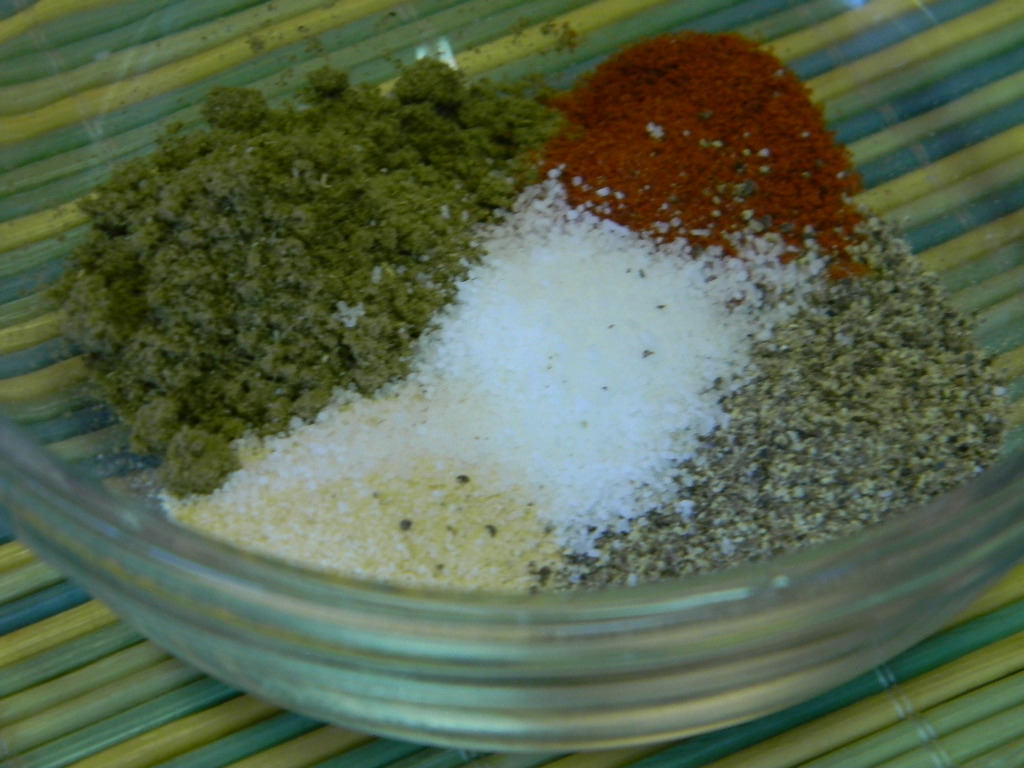
Combine all ingredients. This will rub all sides of 3 pound pork loin roast or both sides of 8 thick-cut boneless pork chops. The rub can be stored in an air-tight container at room temperature.

Dry Rub for Smoking Pork Shoulder or Ribs

You can make the rub in larger quantities and store in an airtight container.


4 tablespoons paprika
4 tablespoons ground sage
3 tablespoons sea salt
2 tablespoons granulated garlic
1 tablespoon ground black pepper
1/4-1/2 cup prepared yellow mustard
an 8-9 pound pork shoulder/Boston Butt

Combine paprika, sage, sea salt, garlic and pepper in small bowl. Rinse pork with cold water and pat dry with paper towels. Place on baking sheet. Rub yellow mustard over all sides of pork. Then, completely coat mustard with dry mixture. Place in refrigerator to allow crust to "set", until smoker is ready. Follow manufacturer's instruction for indirect cooking.

Ummmm.....pork

Kabob Marinade - serves 2

¼ cup canola oil
1 tablespoon Dijon mustard
1 tablespoon honey
pinch sea salt
several grinds black pepper
3-4 cloves garlic, finely minced

Whisk all ingredients together until well combined. Brush over 4 10-inch vegetable or meat and vegetable kabobs placed in shallow baking pan. Place in refrigerator, turning occasionally until ready to grill. During grilling, baste kabobs occasionally with leftover marinade.


Tuesday

Slow-Roasted Pork Shoulder

This, my friends, is about 5 pounds of slow-roasted pork shoulder. Harry did a great job of hand-pulling the meat and now it's ready for a variety of recipes - or just nibbling on it until dinner is ready!

When we find a great deal on a huge piece of meat, we can't pass it up. While we would prefer to smoke it, Harry's cooking hours are severely limited. That doesn't mean I can't have juicy, tender pulled pork that I can use in ways other than sandwiches.

I like to keep slow-roasted pork in the freezer for a quick start to a meal. We use it in a lot of our Asian-inspired dishes such as Hot & Sour Soup or stir-fry. It's super-easy to make a quick Pork Fried Rice when all I have to do is chop the meat. When we roast the pork, I also get a large amount of pork broth that I can use to make pork & noodles or simple open-faced pork sandwiches smothered in gravy.

The prep work for the pork takes about as long as it takes for your oven to preheat to 250 degrees. Low and slow is required to keep the shoulder from drying out. Someday, when I plan far enough ahead, I'd like to experiment with oven-smoking.

The rub for this pork shoulder is simple. We started with close to seven pounds of raw meat (bone-in), so I went a little light with the rub. In a small bowl, combine 1 tablespoon of sage, 1 teaspoon each of Kosher salt, granulated garlic and ground black pepper, and one-half of a teaspoon of paprika.

You can see that I didn't build up a crust on the pork, but rather a nice, light seasoning. You don't want to mask the flavor of the pork by going too heavy with the rub. Add about a half-cup of water or beer, cover the pan with foil, and walk away for about 6 hours. Do the laundry. Clean the bathroom. Sit on the porch with cocktails and watch the clouds pass by.

I never peek before the pork shoulder has been roasting for at least 6 hours - constant checking will allow the moisture to escape. Since we will remove the fat when we pull the pork, I'm not concerned with getting a crispy crust. You want the pork to test at at least 180 degrees Fahrenheit before you remove it. I've gotten distracted and let it go to about 200 degrees without losing any flavor or tenderness.

Once the pork has cooled enough to handle, you can use your clean hands or a pair of forks to pull the meat from the bone. Package the cooled pork and freeze for later use. OR - mix up a batch of it with your favorite barbecue sauce for sandwiches immediately - do NOT forget the dill pickle slices. They are very important.


Wednesday

Red Wine-Braised Short Ribs - March 2012 Daring Cooks Challenge

I don't know if I'm going to be able to upload any other pics from this Daring Kitchen Challenge! I switched to Picasa over the weekend and I'm having techie issues and am not happy. BUT - the above photo is our entry into the March 2012 Daring Cooks Challenge - Red Wine-Braised Short Ribs. I might be able to add more pix later.

The March, 2012 Daring Cooks’ Challenge was hosted by Carol, a/k/a Poisonive – and she challenged us all to learn the art of Braising! Carol focused on Michael Ruhlman’s technique and shared with us some of his expertise from his book “Ruhlman’s Twenty”.

Short ribs - lots of flavor but difficult to cook to edible status, unless you braise. We have avoided short ribs because we generally associate ribs with grilling. The couple of time we've mistakenly tried to cook beef short ribs with our traditional techniques - par-boil or slow-roasting, then finishing on the grill - we've been left with tough, impossible-to-chew chunks with no flavor nor tenderness.

The exciting part about joining the Daring Kitchen was to learn new cooking techniques. So, when this month focused on learning to properly braise and our minds automatically go to meat, we were hooked. In all, while this recipe is heavy on the time commitment, it's rather light in the labor department. Yes, you need to clean and chop a few veggies. Yes, you need to let the ribs simmer in the oven for about 4 hours. However, the fall-off-the-bone tenderness will convince you that you need a go-to recipe for short-ribs when they go on sale.

We made very few changes to the recipe for Red Wine-Braised Short Ribs from Carol (and probably Michael Ruhlman). I bought the last two packages of short ribs available (no, I'm lame - Kroger doesn't cut short ribs in-store) and our meat was around 2 1/2 pounds rather than three pounds. We only used about 12 ounces of fresh, sliced mushrooms rather than the pound suggested because Harry and I are still learning to embrace the fungus. AND, we added about a tablespoon of red wine vinegar to the sauce near the end because ours turned out very earthy and dark and we preferred to brighten it up. Oh - and we served it over rice. The common recommendation is to serve this recipe over mashed potatoes, buttered noodles or polenta. Sorry - we love rice!


Our impressions of the challenge:

* Texture: 5 out of 5! The beef short ribs were incredibly tender, regardless of my feelings as to how they were cut. The meat fell from the bone and I was able to cut through the chunks with my fork. The fat was cooked away during the braise.

*Technique: If I go from the mindset of an inexperienced cook, I have to give this a 3 out of 5. In all honesty, the technique for slow-braising is going to frighten off a cook who's not very experienced in the kitchen. They might not have a pot that will work for the braising method. They might be frightened by the length of time in the oven and not believe the adage that they can just 'walk away' while the meat slow-cooks in the oven. With our kitchen skills, this technique and recipe were a breeze to follow. (Well, I might still be lacking in the searing department.)

*Taste: I  think I'm being unfair to give the taste a 4 out of 5, but I know that it's our personal tastes. The honey, during the slow-braising process, cut through the acidity of the wine and the tomato paste, leaving a pleasant but not syrupy sweet taste in the braising liquid. However, we finish almost every dish with a splash or two of some type of vinegar to brighten up the taste. I have to agree, with the exception of the mushrooms (because I'm trying to learn to embrace the fungus), the portion that I reheated the next day was delicious.

You can visit The Daring Kitchen for the complete recipe for Red Wine-Braised Short Ribs and more.

Tuesday

Roast Beef Po' Boys - almost - for the slow cooker

I say these are "almost" Roast Beef Po' Boys for a few reasons. First, I made our hoagie rolls in our standard 5-6 inches-ish length, rather than making something 8-10 inches like they do in New Orleans. My debris gravy is definitely not authentic. And, while we got them "almost" dressed, there's no such thing as a good tomato in Ohio in February, so they were missing a shirt.

But, yes, that IS gravy dripping down the side!

What is a Po' Boy? A sandwich filled with goodies by another other name is still a sandwich filled with goodies. Your area of the country might call them hoagies or submarine sandwiches or grinders. In New Orleans, Po' Boy is the local lingo. Of course, the most famous versions are usually filled with breaded and fried seafood - shrimp, catfish, crawfish, or oysters. To me, a Roast Beef Po' Boy (poor boy for those who prefer to spell the whole word) is like an open-faced roast beef sandwich all wrapped up in a bun.

Technically speaking, the debris floating in the gravy are bits and pieces of meat that have naturally fallen off the roast while it is braising. I didn't technically braise (slow cooking in liquid) my roast, but it's close enough for rock 'n roll when you're using a slow cooker. When I'm cooking with chuck roast, I prefer to use my slow cooker - turn it on in the morning and around supper time the meat is fall-apart tender. But, when I trimmed the fat, there were a few pieces of meat left in the rind plus a 3-ish ounce piece of roast. I pulled these little bits and pieces out of the fat and added them to my gravy.

Finally, a lesson in dressing your sandwiches in New Orleans. You don't have to say you want "lettuce, tomato, pickles and mayonnaise" on your sandwich, whether it's a po' boy, burger or muffuletta. All you have to do is say "dressed" and your sandwich miraculously comes laden with that specific quartet of goodies. Be warned: if you are in NOLA and you ask for your muffuletta to be dressed, they'll look at you funny.

The voice inside Harry's head told me to trim the biggest part of the fat off of the chuck roast before cooking it. I wasn't about to let that flavor go to waste, so there it sits waiting on its happy purpose. My knife also needed some love and I'm not as skilled in the meat-trimming department as Harry. I made a simple rub of Kosher salt, ground black pepper, paprika, granulated garlic and ground oregano and slapped it on both sides of the meat.

Then, something very strange happened. Harry was at work and the voice in his head told me to sear the meat. Usually, when I'm making a pot roast I just throw everything in the slow cooker and forget about it. I have a strange fear of cooking things at too high of a temperature but this worked very well. Just a few minutes and the flavor at the end was well worth it.

I don't think it's possible to eat beef without onion as flavor. I had a half of a huge sweet onion in the fridge and just sliced it real quick and covered the chuck roast with it. You can't see it but on the very bottom of the crock is the fat I trimmed from the roast - I just used it to make a nice bed for the seared chuck. After the onions, I poured in a half-bottle of Great Lakes Brewing Company's Edmund Fitzgerald Porter (again, I think Harry's voice was speaking to me) and drank the rest. My cooker has settings ranging from 4 hours - high to 10-hours slow. I used 6 hours - high and it was about 7 hours (automatically turns to warm) before I started the gravy.

After pulling out all of the bits and pieces of meat from the fat and setting them aside, I strained the cooking liquid into my saucepan. I added about a half-cup of water and brought it all to a boil, including the bits and pieces of meat. Then, I made an easy flour-water slurry and added enough to thicken the gravy. I also added about a teaspoon of red wine vinegar and even though Harry was sitting there, his lips didn't move when some strange voice told me to add some butter to finish the gravy.

Now, a secret I read yesterday from New Orleans Magazine that the locals won't share with us Yankees is this: they all add a few splashes of hot pepper sauce to their Roast Beef Po' Boys. I have to agree with the logic - the Frank's didn't really add any heat but the vinegar cut through the richness of the gravy for a nice contrast. (The mayonnaise is buried under the shredded iceberg lettuce and yes, I sliced those pickles myself.)

I've actually only had one Roast Beef Po' Boy in Louisiana and it wasn't even in NOLA. We stopped at Abita Brewing in Abita Springs, LA to have a beer and decided we needed to eat. No, I don't think mine is as good as that one was but this sandwich is killer. Harry thanked me for not making them 10 inches long because he still would have felt the need to eat two. This size is just right!

Roast Beef Po' Boys for the Slow Cooker - serves 6
2 1/2 to 3 pound beef chuck roast, trimmed of large fat and rind
1/2 teaspoon Kosher salt
1 teaspoon ground black pepper
1 teaspoon granulated garlic
1 teaspoon ground paprika
1/2 teaspoon ground oregano
1 tablespoon olive oil
6 ounces amber beer or porter (yes, you can use wine or water or beef broth)
1 cup sliced onions

2 tablespoons all-purpose flour
1 1/2 cups cold water, divided
1 teaspoon red wine vinegar
1 tablespoon butter

6 hoagie rolls or submarine sandwich buns, toasted
shredded iceberg lettuce
dill pickle slices
mayonnaise
tomato slices (if available)
hot pepper sauce (if desired)
lots of napkins

In a small bowl, combine salt, pepper, granulated garlic, paprika and ground oregano. After trimming the chuck roast, rub both sides of the meat with the rub ingredients.

Heat a large, heavy-bottomed skillet over medium-high heat. When heated add the olive oil and swirl around, then place the roast, flat-side down, in the skillet. Allow to sear until a nice crust forms on the bottom, about 3-5 minutes. Turn the roast over and sear the other side. Remove from heat and set aside for a moment.

Layer the fat trimmings in the bottom of your slow cooker, then place the seared chuck roast on top of the trimmings. Cover the roast with the onion slices then add the 6 ounces of beer. Cover the cooker and let roast for 6 to 8 hours or until very tender.

Remove roast to a plate and cover with foil to keep it warm. Remove any small pieces of meat that might remain in the slow cooker or the fat and set aside in a bowl. Strain the cooking liquid into a saucepan, add 1/2 cup of water and the bits and pieces of meat, then bring to a strong simmer.

In a cup or bowl, mix 2 tablespoons all-purpose flour with one cup of cold water until smooth. Slowly add the slurry to the simmering liquid, whisking to prevent lumps, until the gravy is thickened. Add the red wine vinegar and continue to cook for 5 minutes until the flour taste is gone. Whisk in the tablespoon of butter and the gravy is finished.

To assemble the Roast Beef Po' Boys:

Thinly slice the reserved roast beef. On each toasted hoagie roll, spread mayonnaise on the top half. Pile several slices of roast beef on the bottom half of the bun and then ladle on some gravy. Top with tomato, pickle, hot pepper sauce and shredded lettuce and serve with several napkins.

Harry's Mom's Meatloaf

For some people, meatloaf is boring but for many households, it's a fairly easy go-to dinner when time is tight. We we make meatloaf, it's always two loaves - Harry loves sandwiches and sometimes, we don't even eat it for dinner but make it specifically for meatloaf sammies.

I love my mom's meatloaf - when she makes it. Mine never turned out the same for some reason. I failed HUGE with a meatloaf recipe in 1984 that caused my then-husband to turn green at the slightest mention of meatloaf for dinner. OK, ok, the sausage wasn't quite as thawed as it should have been and that was long before I learned the joys of a digital thermometer. When Harry and I started The Wright Taste, my ex-mother-in-law - more than 20 years after the fact - chirped "You can't even make a meatloaf and you expect people to buy food from you?"

Harry wasn't, in general, a fan of his mother's cooking. We both have memories of the same general meals and these days, I'm not a fan of the way my mom cooked a lot of things when I was a kid. I still loved them - the only place I'll eat Ragu on my spaghetti is when Mom makes it - it's kind of hard to explain. And I STILL can't get my Boiled Dinner (corned beef and cabbage) to come out the same way Mom does, even if we buy the same brand of corned beef at the same time!

But Harry did like his mom's meatloaf and the first time he showed me the recipe, I thought "ICK!" But, this is the best meatloaf recipe I've ever tried. It's never dry and it's the perfect sandwich meatloaf - it doesn't get crumbly when you slice it and it also freezes beautifully.

This is the "normal" recipe - plenty for dinner for six plus leftover for sandwiches. Save yourself a little time and double the recipe. Freeze one loaf whole to heat for another dinner or freeze it in slices for sandwiches later. I don't know where Mrs. W got the recipe but since Harry was eating this as a kid in the late 50's, early 60s, I don't stand a chance of tracking down the original source.

Harry's Mom's Meatloaf

2 pounds ground chuck
1 cup plain bread crumbs
1 can evaporated milk
3 tablespoons ketchup
2 tablespoons dried minced onion
2 eggs, lightly beaten
1 teaspoon granulated garlic
1 teaspoon Frank's Red Hot
1 teaspoon salt
3 tablespoons butter, melted and cooled

Preheat oven to 350 degrees. In a medium bowl, combine the evaporated milk, ketchup, dried minced onion, eggs, granulated garlic, Frank's and salt. Mix it well and set aside. In a large bowl, combine the ground chuck with the bread crumbs - take your time to work all the crumbs into the meat.


Now is when it will get really messy: Have Harry pour the liquid mixture into the ground beef mixture. As you squeeze the liquid into the meat, it will originally appear to be very soupy. Mix it with your hands until the liquid and meat are well-combined, then allow to rest for five minutes. The resting time will give the bread crumbs time to absorb the moisture, so it's possible to form it into loaves.

Add the cooled melted butter and mix well. Now it's time to shape your meat loaf. Only shape it into two loaves if you have doubled the recipe.

This is where I deviate from Harry's mom's recipe: I love ketchup baked onto my meatloaf. Harry's mom always covered it with American cheese slices - the choice is yours.

Bake, uncovered, at 350 degrees for about an hour. I check the temp and try to keep it between 170 and 180 degrees inside.

Remove from oven and let rest for five minutes. Then, remove to a serving platter (to get it out of the grease), cover with foil and allow to stand for another 10 minutes - this will help the meatloaf "stiffen up" so that it's easier to cut without crumbling.
Related Posts Plugin for WordPress, Blogger...