We bought a Ninja Bullet back in the fall and I immediately started making smoothies a couple of times a week for breakfast. I went pretty basic - frozen fruit, yogurt, and orange juice. I'm not quite to the point of going to a green smoothie. But, I really wanted to add more protein into my smoothies, maybe cut back the yogurt.
I started reading about the different seeds you can add to your smoothies, exploring the protein benefits and wondering which seeds I would like the best. I narrowed it down to choosing between chia seeds or hemp seeds, and I was leaning to hemp because I couldn't get the thought of Chia Pets out of my mind. Harry gently reminded me that I should probably check for chia because they would more than likely be more readily available than hemp seeds.
An important note: hemp seeds will not give you a buzz. They are not from the exact same plant as marijuana. Rather, hemp is a cousin.
Shortly after I started looking for seeds to add to my breakfast smoothies, I had the opportunity to try Super Hemp Raw Shelled Organic Hemp Seeds in exchange for my unbiased opinion. What a great way to be introduced!
Hemp seeds are tiny - smaller than sunflower seeds. They have a nutty, almost buttery flavor and an awesome crunch. I immediately started adding about a tablespoon of these morsels to my breakfast smoothies. To me, the mixed texture was nice.
So - what else can you do with hemp seeds? The nutty/buttery flavor makes them an awesome topping for steamed veggies or baked potatoes. Sprinkle some hemp seeds on top of your muffins before baking for an added crunch. Or, stir about a half-cup into your muffin batter. I've been adding a handful to my lunch salads.
Would you be interested in trying Hemp Seeds if you received a 50% discount?
If you've been considering adding more plant-derived protein to your diet like I was, hemp seeds aren't a bad route to go. When you order the Super Hemp via Amazon, you'll also receive a lot of great information and suggestions as to how to use them.
We're just a couple who loves to play with our food. Come play in our kitchen with us!
Showing posts with label dieting. Show all posts
Thursday
Monday
Edamam Nutrition Wizard - Review
One of the hardest battles we fight in the kitchen isn't against each other. The battle we wage is trying to eat more healthy. It's obvious from our posts that we enjoy food. Harry's not a fan of veggies. I love to bake (fortunately, neither of us really likes to eat sweets).
I was given the opportunity to review the Edamam Nutrition Wizard in exchange for my inspection and review.
I've used many nutrition analysis websites in the past. Usually, I find them very slow and difficult to work with - especially because we cook primarily from scratch. One of my favorites was SparkPeople, but it worked best with packaged foods. I tried one a few weeks ago through another website. I gave up after entering just my beverages, breakfast, and lunch. It was so slow and clunky.
Edamam Nutrition Wizard is not clunky. It is only similar to others in that it is a web-based nutrition analysis program. The Nutrition Wizard not only analyzes your recipes, you can save them within the system as well. The Plus Version that I tried out also gives the option of exporting your recipes and analysis.
I already have so many of our recipes saved in Word documents, it was easy for me to copy and paste my recipes into the website. A click of the button not only gave me the calorie counts, it confirmed that my recipe was low sodium and free of many dietary restrictions others might have, including gluten, dairy, shellfish, and soy. There is also a breakdown of fat, protein, carbs, and numerous minerals.
You can also use the Eamam Nutrition Wizard to analyze recipes you find while surfing the web or Pinterest. Simply copy the ingredient list into the Wizard, let it know how many servings, and you'll know if that fad "low-fat, low-carb" recipe is as healthy as the poster claims it to be. For the record, our Summer Rice Salad is a very healthy side dish. On the other hand, I'm not sure I'll ever make our Grill Roasted Stuffed Peppers again in their current recipe form.
The Edamam Nutrition Wizard is available for $2.95 per month, and the Plus version - with the ability to print and export the information - is $5.95 per month. I think it's worth $36 a year for any family to learn a little more about the food they are preparing. The system would also be helpful for home-based food businesses to learn a little more about the products they are selling.
Sunday
Pesto Chicken Roulade
Chicken has found a larger presence in our diet over the last year. We both enjoy it, but sometimes it's just hard to come up with something different. A gal I work with mentioned buying some stuffed chicken breasts at the store, and one of them was a pesto and something. I mentioned it to Harry and we decided to give it a try.
Roulade is simply a fancy term for "roll-up". The chicken breasts we buy at Lanning's are HUGE and this would easily serve four people. In fact, I think I made it one night when we were kind of tired and it was the only thing we ate - and still had leftovers. I've taken the leftovers to work and heated in the microwave with no issues.
This isn't really a recipe that can be measurement specific. Count on one large breast for every two people you plan to serve.
I trimmed the extra fat from each breast, then put it inside a zip bag. It's great therapy to pound the dickens out of a piece of meat.
I use the zip bag because I'm not fond of raw chicken juice flying around the kitchen.
After the chicken, the ingredients are pretty simple. I used about a half-cup of pesto to cover both breasts, about a half-cup of parmesan-romano blend, one-third of a cup of mayo and just enough panko to coat. Use your own homemade pesto, mayo and crumbs, along with your fresh-grated cheese. We've had to make some sacrifices (read: cut some corners when we don't have hours to spend in the kitchen) since we both went back to work full time.
The pesto isn't coated too thick, nor the cheese - go with your own tastes. In the end, we found a nice balance between the chicken and the filling. I learned by error that pesto can be overwhelming if I use a too-heavy hand.
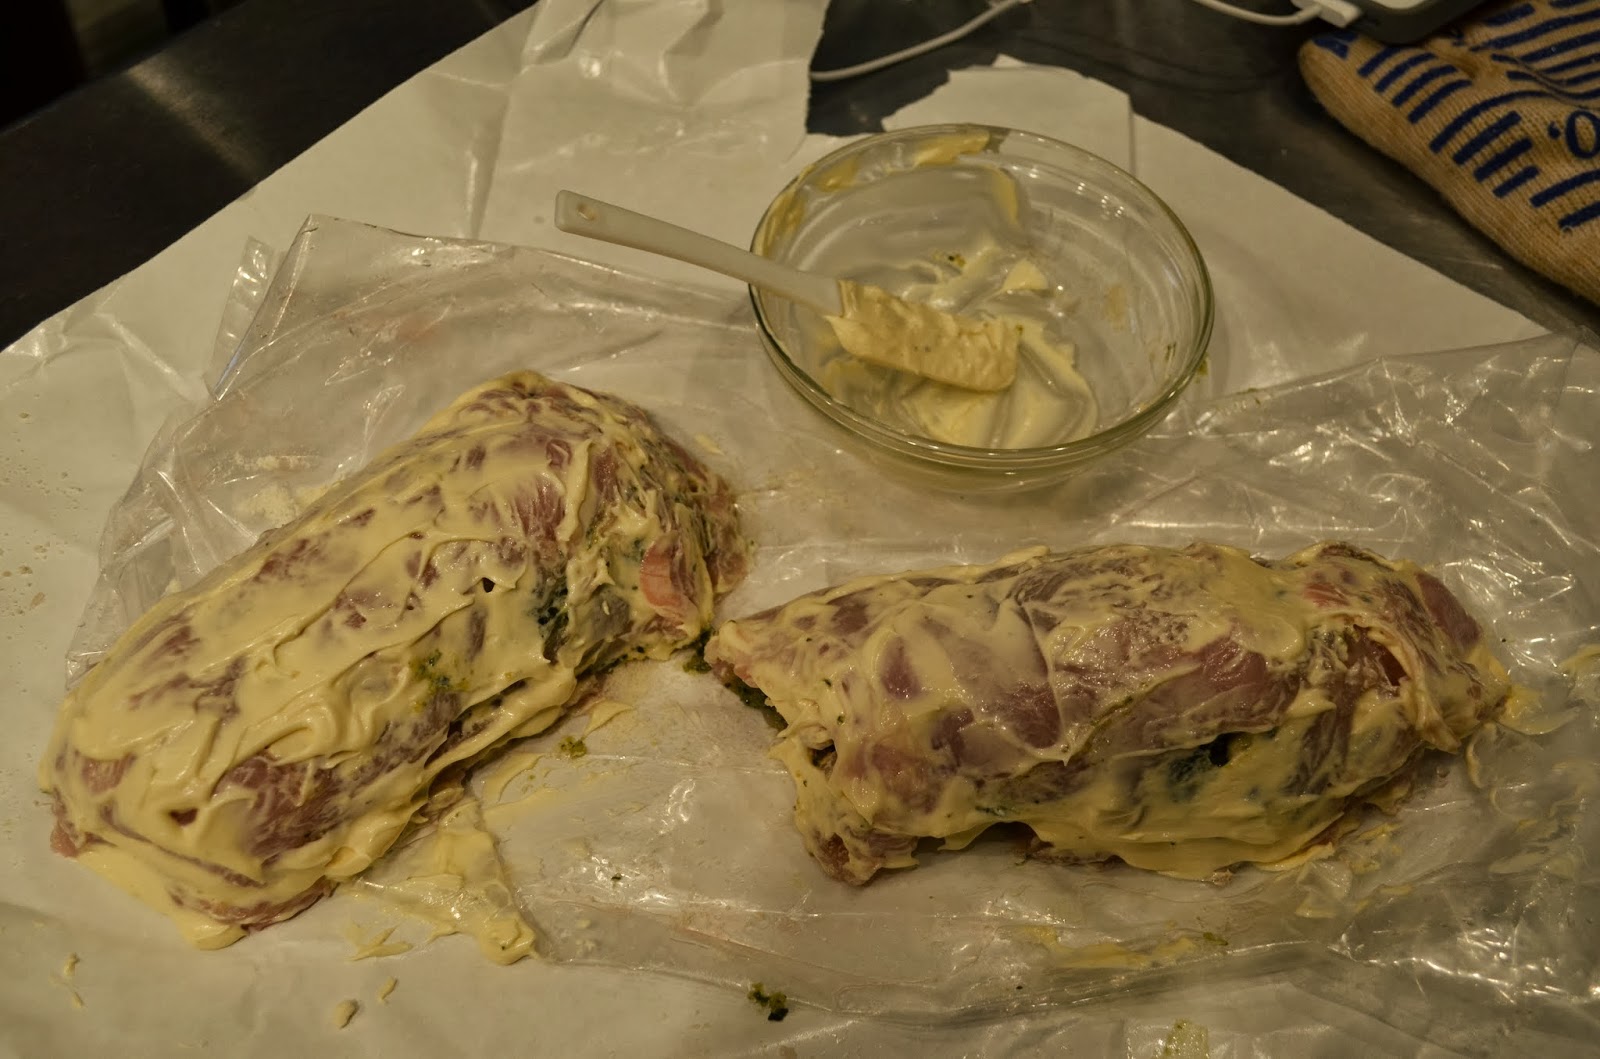
Then, roll up the chicken from the long side. Place seam side down on your work surface. I did all of this on the paper that the chicken was wrapped in.
I might have gone a little heavy with the mayo on this try. Trust me when I say the mayo does nothing more than seal the moisture in and keep the crumbs attached. After this was cooked, we didn't taste the mayonnaise. The chicken, however, was SO juicy.
Sprinkle on a coating of panko (I've also used regular dried bread crumbs with success) and place the breasts in a pan. Bake at 350 degrees for about an hour, or until your thermometer reads 160 degrees.
The crust browns nicely at 350. I wouldn't recommend going much higher - the crust might brown too quickly and the chicken get dry before the inside is cooked through.
Harry sliced the Pesto Chicken Roulade and it came out rather nicely for our first attempt at something like this. The bruschetta was yummy too!
As I said above, this is more for an idea of what else to do with chicken. Pound your breasts flat, smear them with ingredients you enjoy, roll it up and bake it.
Enjoy!
The great homemade yogurt experiment - round one
This was my breakfast this morning. Yeah, I love a hearty breakfast filled with peameal bacon, scrambled eggs, whole wheat pancakes, biscuits and sausage gravy and any host of other breakfast yumminess. But, Harry's working 6-7 days a week and I'm still working on actually eating breakfast every day AND I made my first batch of homemade yogurt in more than 20 years.
Back in the day when I was young and married and filled with adoration of making everything from scratch, we made yogurt often. The father of my children had purchased one of those Salton makers when he was a teenager and yeah, it worked OK. My memories are hazy but I do recall that the yogurt was usually very dry and sour to the taste, and I always had to flavor it heavily to get the kids to eat it. Then, we got divorced, I got custody of the kids and he got custody of the yogurt maker.
Even though I was reduced to buying yogurt at the store, I'm pretty sure I got the better end of the deal.
A couple of years ago, I came across an article from my friend Angie, How to Make Raw Milk Yogurt . I've lived in this area my entire life. I'll admit to not being involved in the local farmers market scene until about five years ago, but those raw milk people are very, very secretive. I was interested in getting my hands on some to make a sourdough starter. NO ONE would talk to me. The one person who admitted to knowing someone who might be able to get some raw milk wouldn't help me out - I guess he was afraid I would follow him.
So, I was stuck buying my milk at Kroger because I didn't have time to go to the Hill's Market to get some low-temp pasteurized milk.
I found a post via Pinterest (are you addicted yet? shoot me an e-mail at debbieandharryskitchen at gmail dot com and I'll send you an invitation) from Emily at Keeper of the Home explaining the slow cooker method of making homemade yogurt. Emily was making 8-cup batches in a round slow cooker. But, I had read a few other yogurt-making blog posts that indicated my huge, oval slow cooker might not work well with a small amount. So, I'm starting with a half-gallon of organic whole milk that, unfortunately, is ultra-pasteurized but at least it's not UHT.
For my yogurt starter, I bought (mistakenly, because I meant to get full-fat) an organic fat-free plain Greek yogurt. In reading through comments from other homemade yogurt-makers, I found that I should try to get a yogurt that has at least five active cultures.
Time to start - by the way, the actual working time about 20 minutes.
Plug in your slow cooker and turn it on to heat up while you are heating the milk. I put mine on the "High - 4 Hour" setting. I poured the milk into a heavy-bottomed saucepan and heated it over medium until it was 185 degrees Fahrenheit. Stir the milk every once in awhile so it doesn't stick to the bottom and scorch.
As soon as the milk hit the right temperature, I put it into half a sink-full of cold water (make sure the water doesn't come up over the top of the pot!). I don't know if I was supposed to leave the milk 'still' but I kind of stirred it around with my digital thermometer until the temperature was right around 100 degrees.
I took my starter yogurt out of the fridge when I started heating the milk. The picture is deceiving - it was a 5.3 ounce container. Add about one cup of the cooled milk to the yogurt to temper it, then add the yogurt/milk mixture to the rest of the milk in the slow cooker.
Turn off and unplug your slow cooker and wrap it in a huge, heavy towel. I took care to tuck the towel under the sides of the cooker. And, in the words of my favorite kitchen geek Alton Brown, 'just walk away'. Leave the yogurt sit idly for 6 to 10 hours. Emily said she usually leaves hers for 8 hours (again, she makes one-quart batches). I unwrapped the yogurt at 9 hours and immediately put it into the fridge where it slept overnight.
Emily suggested resting in the fridge for 12 hours. Mine was there for a little longer than that because the satellite guy showed up early to install the new receiver/DVR so we can feed our "Walking Dead" addiction. After he left, this is what I found. I was shocked that the yogurt seemed so firm! Wow - I actually did it. I made homemade yogurt and I have visions of smoothies and dressings and just yogurt with granola for breakfast dancing in my head. I also saved back one cup of the yogurt in a separate container to start my next batch.
For my first try, I'm very happy. The full texture, once I poured it out of the slow cooker into a container, is a little less thick than your standard Greek yogurt. But, one of my teenage memories of yogurt is staying with a family near Barneveld, Holland and pouring the yogurt out of a carton like milk, then adding a spoonful of this wonderful woman's homemade strawberry preserves. The taste of this yogurt is actually very mild. I was trying to explain it to Harry last yesterday - think about a mildly dry wine, it doesn't suck your cheeks into each other when you taste it and there's just a bit of sour tang.
So, for breakfast this morning, I had some of my homemade yogurt over some really good granola I found in the natural foods section at Kroger. I sprinkled on just a pinch of turbinado sugar, but the granola has a natural sweetness from pomegranate, acai and apples that balanced with the tart of the plain yogurt - I really didn't need the sugar but it sure looks pretty.
The yogurt experiment will be ongoing. I'd like to make smaller batches more often just so I don't risk letting any go bad. I need to know how many times I can "inbreed" my starter before it stops working. I'm sure if I were to use this to start a salad dressing, I would definitely drain it for awhile to thicken it. I'm also thinking about trying a yogurt cheese.
Back in the day when I was young and married and filled with adoration of making everything from scratch, we made yogurt often. The father of my children had purchased one of those Salton makers when he was a teenager and yeah, it worked OK. My memories are hazy but I do recall that the yogurt was usually very dry and sour to the taste, and I always had to flavor it heavily to get the kids to eat it. Then, we got divorced, I got custody of the kids and he got custody of the yogurt maker.
Even though I was reduced to buying yogurt at the store, I'm pretty sure I got the better end of the deal.
A couple of years ago, I came across an article from my friend Angie, How to Make Raw Milk Yogurt . I've lived in this area my entire life. I'll admit to not being involved in the local farmers market scene until about five years ago, but those raw milk people are very, very secretive. I was interested in getting my hands on some to make a sourdough starter. NO ONE would talk to me. The one person who admitted to knowing someone who might be able to get some raw milk wouldn't help me out - I guess he was afraid I would follow him.
So, I was stuck buying my milk at Kroger because I didn't have time to go to the Hill's Market to get some low-temp pasteurized milk.
I found a post via Pinterest (are you addicted yet? shoot me an e-mail at debbieandharryskitchen at gmail dot com and I'll send you an invitation) from Emily at Keeper of the Home explaining the slow cooker method of making homemade yogurt. Emily was making 8-cup batches in a round slow cooker. But, I had read a few other yogurt-making blog posts that indicated my huge, oval slow cooker might not work well with a small amount. So, I'm starting with a half-gallon of organic whole milk that, unfortunately, is ultra-pasteurized but at least it's not UHT.
For my yogurt starter, I bought (mistakenly, because I meant to get full-fat) an organic fat-free plain Greek yogurt. In reading through comments from other homemade yogurt-makers, I found that I should try to get a yogurt that has at least five active cultures.
Time to start - by the way, the actual working time about 20 minutes.
Plug in your slow cooker and turn it on to heat up while you are heating the milk. I put mine on the "High - 4 Hour" setting. I poured the milk into a heavy-bottomed saucepan and heated it over medium until it was 185 degrees Fahrenheit. Stir the milk every once in awhile so it doesn't stick to the bottom and scorch.
As soon as the milk hit the right temperature, I put it into half a sink-full of cold water (make sure the water doesn't come up over the top of the pot!). I don't know if I was supposed to leave the milk 'still' but I kind of stirred it around with my digital thermometer until the temperature was right around 100 degrees.
I took my starter yogurt out of the fridge when I started heating the milk. The picture is deceiving - it was a 5.3 ounce container. Add about one cup of the cooled milk to the yogurt to temper it, then add the yogurt/milk mixture to the rest of the milk in the slow cooker.
Turn off and unplug your slow cooker and wrap it in a huge, heavy towel. I took care to tuck the towel under the sides of the cooker. And, in the words of my favorite kitchen geek Alton Brown, 'just walk away'. Leave the yogurt sit idly for 6 to 10 hours. Emily said she usually leaves hers for 8 hours (again, she makes one-quart batches). I unwrapped the yogurt at 9 hours and immediately put it into the fridge where it slept overnight.
Emily suggested resting in the fridge for 12 hours. Mine was there for a little longer than that because the satellite guy showed up early to install the new receiver/DVR so we can feed our "Walking Dead" addiction. After he left, this is what I found. I was shocked that the yogurt seemed so firm! Wow - I actually did it. I made homemade yogurt and I have visions of smoothies and dressings and just yogurt with granola for breakfast dancing in my head. I also saved back one cup of the yogurt in a separate container to start my next batch.
For my first try, I'm very happy. The full texture, once I poured it out of the slow cooker into a container, is a little less thick than your standard Greek yogurt. But, one of my teenage memories of yogurt is staying with a family near Barneveld, Holland and pouring the yogurt out of a carton like milk, then adding a spoonful of this wonderful woman's homemade strawberry preserves. The taste of this yogurt is actually very mild. I was trying to explain it to Harry last yesterday - think about a mildly dry wine, it doesn't suck your cheeks into each other when you taste it and there's just a bit of sour tang.
So, for breakfast this morning, I had some of my homemade yogurt over some really good granola I found in the natural foods section at Kroger. I sprinkled on just a pinch of turbinado sugar, but the granola has a natural sweetness from pomegranate, acai and apples that balanced with the tart of the plain yogurt - I really didn't need the sugar but it sure looks pretty.
The yogurt experiment will be ongoing. I'd like to make smaller batches more often just so I don't risk letting any go bad. I need to know how many times I can "inbreed" my starter before it stops working. I'm sure if I were to use this to start a salad dressing, I would definitely drain it for awhile to thicken it. I'm also thinking about trying a yogurt cheese.
Saturday
Lightened Up Italian Wedding Soup
Please pay no attention to the fact that my work table is apparently crooked! This Italian Wedding Soup was so easy and so fast! It's a little bit on the "light and brothy" side for Harry, but I made up a batch of calzones to go with it and the meal was hearty and satisfying.
I love Italian Wedding Soup, but I've only ever had it in restaurants. So, I had to turn to the web looking for inspiration. The first recipe I found via Pinterest turned me off - it suggested adding beaten eggs to the finished soup, similar to Hot & Sour or Egg Drop Soup. That definitely didn't ring any bells for me so I kept searching. I actually found this one at Cooksdotcom and it gave me a good starting point.
I had our homemade chicken stock in the fridge but decided to go with canned vegetable broth instead to cut down the fat content. I've made my own vegetable stock but I'm usually money ahead to use the canned stuff (very rare!). I used our own meatball mix that I froze in bulk for this purpose, but you could easily use turkey meatballs to cut down on the fat some more or frozen meatballs of your pleasure. The seasonings in the meatballs were just right to flavor the broth and I only added a pinch of salt and a few grinds of pepper.
I'm starting with raw meatballs and borrowing a tip from my friend Pam - she never browns her meatballs before adding them to sauce or soup. After the broth came to a simmer, I gently added the meatballs and remembered to stir gently so I did break them up. They cooked beautifully and I think it helped them release their flavors.
I'm always trying to sneak vegetables into our meals and this soup is no exception. I knew we probably wouldn't eat a whole bunch (head?) of spinach before it went bad and didn't want to go to heavy with it in here. We were in a Kroger that had a salad bar so I just bought enough to tightly fill a one-cup measure. Hey, it only cost 23 cents!
And the rest of the veggies I snuck in - every little bit helps!
Lightened-Up Italian Wedding Soup Recipe
1 stalk celery, diced
1 carrot, diced
1/2 medium sweet onion, diced
drizzle of extra virgin olive oil
3 cans (15-ish ounces) vegetable broth
1 cup water
1 pound small meatballs
1/2 cup dry orzo (or broken spaghetti)
Kosher salt and fresh-ground black pepper, to taste
1 cup fresh leaf spinach
In a medium saucepan, saute the celery, carrot and onion in olive oil just until softened. Add the vegetable broth and water, then bring it to a simmer.
Gently add the meatballs, then allow to simmer for 15 minutes. Increase the heat to medium.
Add the orzo, stirring gently and cook until orzo is al dente, about 10 minutes. Taste the broth and adjust the seasoning.
Remove the pan from the heat and stir in the spinach just before serving.If you're feeling really indulgent, feel free to top the Italian Wedding Soup with some freshly grated Parmesan cheese.
I love Italian Wedding Soup, but I've only ever had it in restaurants. So, I had to turn to the web looking for inspiration. The first recipe I found via Pinterest turned me off - it suggested adding beaten eggs to the finished soup, similar to Hot & Sour or Egg Drop Soup. That definitely didn't ring any bells for me so I kept searching. I actually found this one at Cooksdotcom and it gave me a good starting point.
I had our homemade chicken stock in the fridge but decided to go with canned vegetable broth instead to cut down the fat content. I've made my own vegetable stock but I'm usually money ahead to use the canned stuff (very rare!). I used our own meatball mix that I froze in bulk for this purpose, but you could easily use turkey meatballs to cut down on the fat some more or frozen meatballs of your pleasure. The seasonings in the meatballs were just right to flavor the broth and I only added a pinch of salt and a few grinds of pepper.
I'm starting with raw meatballs and borrowing a tip from my friend Pam - she never browns her meatballs before adding them to sauce or soup. After the broth came to a simmer, I gently added the meatballs and remembered to stir gently so I did break them up. They cooked beautifully and I think it helped them release their flavors.
I'm always trying to sneak vegetables into our meals and this soup is no exception. I knew we probably wouldn't eat a whole bunch (head?) of spinach before it went bad and didn't want to go to heavy with it in here. We were in a Kroger that had a salad bar so I just bought enough to tightly fill a one-cup measure. Hey, it only cost 23 cents!
Lightened-Up Italian Wedding Soup Recipe
1 stalk celery, diced
1 carrot, diced
1/2 medium sweet onion, diced
drizzle of extra virgin olive oil
3 cans (15-ish ounces) vegetable broth
1 cup water
1 pound small meatballs
1/2 cup dry orzo (or broken spaghetti)
Kosher salt and fresh-ground black pepper, to taste
1 cup fresh leaf spinach
In a medium saucepan, saute the celery, carrot and onion in olive oil just until softened. Add the vegetable broth and water, then bring it to a simmer.
Gently add the meatballs, then allow to simmer for 15 minutes. Increase the heat to medium.
Add the orzo, stirring gently and cook until orzo is al dente, about 10 minutes. Taste the broth and adjust the seasoning.
Remove the pan from the heat and stir in the spinach just before serving.If you're feeling really indulgent, feel free to top the Italian Wedding Soup with some freshly grated Parmesan cheese.
Sunday
Merry New Year!!!!
As long as I live, I will never forget the scene on the train in "Trading Places."
Good stuff!
Another year - another year of goals! I did reach some of my goals last year. My weight was not one of them! Oh, we would have good intentions but the food is just so good! I have an awesome incentive this year: I'm going to be a Gramma in June! Yes, we all want to be more healthy and live longer lives but there's something about the impending arrival that sort of kicks you in the ass and says "no, seriously - I want to dance at my grandchild's wedding."
Before that, though, I have a wedding reception to prepare for! Trey and Nicole want it casual - here at the cabin and a rather casual theme for the food: Cinco de Mayo! This is going to take a bit of planning to make it special but stay within our budget. They also want a margarita toast rather than champagne - that's something I can't wait to play with! My first thought goes to strawberry-something-something but the Ohio strawberries won't arrive until June at least.
Speaking of June, I'm going to my first writer's conference: BlogHer Food in Seattle! I'm hoping that Harry will be able to go with me but it truly depends on his work schedule. If he does get some comp time by then, he would much rather spend it catching Walleye on the French River - well, so would I - but I need to take this opportunity to learn.
I've long been a fan of Ree Drummond over at The Pioneer Woman but a few months ago I totally became a fangirl of Irvin Lin at Eat the Love - follow that link and see why. Food porn. Glorious food porn and a more scientific approach to baking than I've ever been patient enough to try. He's also running a giveaway for a few more days. Someday, when I'm a big kid, I'll collect swag that I can give away!
While 2011 was a year of economic recovery for us, I just wasn't quite comfortable enough to say to Harry "Hey - let's go on a taco truck tour!" He's totally psyched about something like that and we will hit up Columbus Food Adventures in 2012. To start the year, we'll be hitting up the Winter Beer Fest in just a couple of weeks!
As for today, it's time to get my kitchen back into shape for playing with food AND dieting! I need to move some of the pantry ingredients that are filling my counters back into storage. The Kitchen-Aid will be removed from its permanent home on my work table to keep room for the fruit basket. Oh - it won't go far, I still have to bake bread. Our traditional New Year's Day dinner of dead pig and sauerkraut is on tap along with garlic smashed taters and a salad.
We're not planning a huge deal for the Ohio State/Florida Gator Bowl on Monday because Harry starts back to the gawd-awful 3:00 AM start time on Tuesday - UGH! Good thing the game is in the afternoon - some simple munchies of guac and salsa along with Devils on a Horse. Harry's more excited about having Tortellini Soup because I haven't made it in a bazillion years! Found a great deal on frozen tortellini at Kroger yesterday and grabbed two bags. Maybe he'll get it twice this year!
Merry New Year to all! What are your goals for 2012? Oh - and I really could use some food ideas for that Cinco de Mayo wedding reception!
Good stuff!
Another year - another year of goals! I did reach some of my goals last year. My weight was not one of them! Oh, we would have good intentions but the food is just so good! I have an awesome incentive this year: I'm going to be a Gramma in June! Yes, we all want to be more healthy and live longer lives but there's something about the impending arrival that sort of kicks you in the ass and says "no, seriously - I want to dance at my grandchild's wedding."
Before that, though, I have a wedding reception to prepare for! Trey and Nicole want it casual - here at the cabin and a rather casual theme for the food: Cinco de Mayo! This is going to take a bit of planning to make it special but stay within our budget. They also want a margarita toast rather than champagne - that's something I can't wait to play with! My first thought goes to strawberry-something-something but the Ohio strawberries won't arrive until June at least.
Speaking of June, I'm going to my first writer's conference: BlogHer Food in Seattle! I'm hoping that Harry will be able to go with me but it truly depends on his work schedule. If he does get some comp time by then, he would much rather spend it catching Walleye on the French River - well, so would I - but I need to take this opportunity to learn.
I've long been a fan of Ree Drummond over at The Pioneer Woman but a few months ago I totally became a fangirl of Irvin Lin at Eat the Love - follow that link and see why. Food porn. Glorious food porn and a more scientific approach to baking than I've ever been patient enough to try. He's also running a giveaway for a few more days. Someday, when I'm a big kid, I'll collect swag that I can give away!
While 2011 was a year of economic recovery for us, I just wasn't quite comfortable enough to say to Harry "Hey - let's go on a taco truck tour!" He's totally psyched about something like that and we will hit up Columbus Food Adventures in 2012. To start the year, we'll be hitting up the Winter Beer Fest in just a couple of weeks!
As for today, it's time to get my kitchen back into shape for playing with food AND dieting! I need to move some of the pantry ingredients that are filling my counters back into storage. The Kitchen-Aid will be removed from its permanent home on my work table to keep room for the fruit basket. Oh - it won't go far, I still have to bake bread. Our traditional New Year's Day dinner of dead pig and sauerkraut is on tap along with garlic smashed taters and a salad.
We're not planning a huge deal for the Ohio State/Florida Gator Bowl on Monday because Harry starts back to the gawd-awful 3:00 AM start time on Tuesday - UGH! Good thing the game is in the afternoon - some simple munchies of guac and salsa along with Devils on a Horse. Harry's more excited about having Tortellini Soup because I haven't made it in a bazillion years! Found a great deal on frozen tortellini at Kroger yesterday and grabbed two bags. Maybe he'll get it twice this year!
Merry New Year to all! What are your goals for 2012? Oh - and I really could use some food ideas for that Cinco de Mayo wedding reception!
Saturday
New Year...new start
I hate to be such a cliche, but it's a common thing for people to resolve to lose weight at the beginning of the year. I have no choice. I can not continue on the path I am going or I will weigh more than Harry by the end of the year.
Harry and I cook - I mean "really" cook. Everything is from scratch except a couple of nasty concoctions that are more like guilty pleasures during football season. You won't find fake anything in the kitchen. Well, I do buy low-fat mayo because I got used to it years ago. Neither of us like the taste of whole milk, so we drink 2%. I do occasionally cook with heavy cream or half & half.
I hope to some of my kitchen time this year experimenting with our favorite recipes to see if I can find ways to cut the fat & calories and beef up the veggie content without freaking Harry out.
The first place to start is with the raw stuff - salads and veggies to munch on! Harry loves raw veggies, he's just not a fan of anything cooked - especially if it's "hillbilly" cooked meaning cooked to mush. I did get him to admit that he'd probably like mashed rutabaga. Of course for me that involves adding butter, sugar, salt and pepper!
When we had loads of fresh local veggies last summer and lots of salads, I did play around and develop a few fat-free salad dressings. For creamy dressings, I start with fat-free plain yogurt. I usually strain it for awhile to make it thicker.
Here's the link to those fat-free salad dressings:
Homemade Fat-Free Salad Dressings
I think every kitchen needs a digital scale but it's an even better tool for dieters!
Harry and I cook - I mean "really" cook. Everything is from scratch except a couple of nasty concoctions that are more like guilty pleasures during football season. You won't find fake anything in the kitchen. Well, I do buy low-fat mayo because I got used to it years ago. Neither of us like the taste of whole milk, so we drink 2%. I do occasionally cook with heavy cream or half & half.
I hope to some of my kitchen time this year experimenting with our favorite recipes to see if I can find ways to cut the fat & calories and beef up the veggie content without freaking Harry out.
The first place to start is with the raw stuff - salads and veggies to munch on! Harry loves raw veggies, he's just not a fan of anything cooked - especially if it's "hillbilly" cooked meaning cooked to mush. I did get him to admit that he'd probably like mashed rutabaga. Of course for me that involves adding butter, sugar, salt and pepper!
When we had loads of fresh local veggies last summer and lots of salads, I did play around and develop a few fat-free salad dressings. For creamy dressings, I start with fat-free plain yogurt. I usually strain it for awhile to make it thicker.
Here's the link to those fat-free salad dressings:
Homemade Fat-Free Salad Dressings
I think every kitchen needs a digital scale but it's an even better tool for dieters!
Subscribe to:
Posts (Atom)